Fork me on GitHub

springboot配置文件(2)

eclipse没有提示解决

点击window => Preferences

找到java下面的Editor下的Content Assist

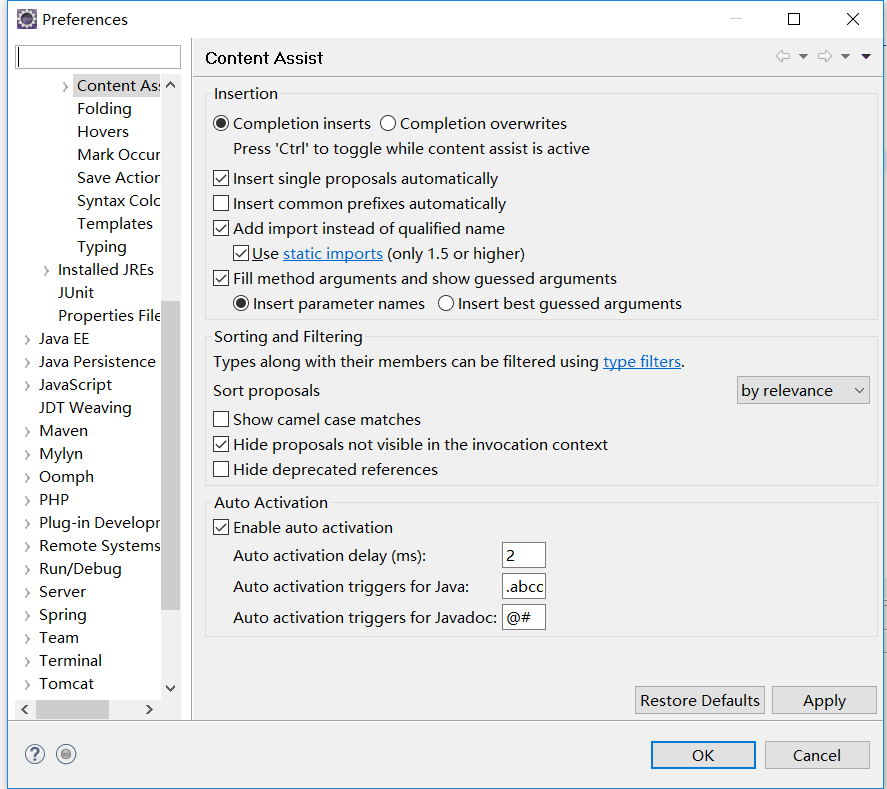
将Auto activation delay的值改小一点

然后将Anto activation triggers for Java 的值改成 .abcdefghijklmnopqrstuvwxyzABCDEFGHIJKLMNOPQRSTUVW

第一个实例 Hello Spring Boot

新建一个controller
HelloController

1
2
3
4
5
6
7
8
9
10
package com.example.demo;
import org.springframework.web.bind.annotation.*;
@RestController

public class HelloController {
@RequestMapping(value="/hello",method=RequestMethod.GET)
public String say(){
return "Hello Spring Boot";
}
}

重启

访问:http://127.0.0.1:8080/hello

属性配置;

项目的配置文件:application.properties

1
2
server.port=8081
server.context-path=/boy

重启:http://127.0.0.1:8081/boy/hello

但是在这里推荐使用:application.yml(application.properties删掉)

格式如下

1
2
3
server:
port: 8082
context-path: /boy

配置文件的使用

1
2
3
4
5
6
server:
port: 8082
context-path: /boy
size: boy
age: 10
content: "size: ${size},age: ${age}"

调用:

1
2
3
4
5
6
7
8
9
10
11
12
13
14
15
16
17
18
19
20
package com.example.demo;
import org.springframework.beans.factory.annotation.Value;
import org.springframework.web.bind.annotation.*;
@RestController
public class HelloController {

@Value("${size}")
private String size;

@Value("${age}")
private Integer age;

@Value("${content}")
private String content;

@RequestMapping(value="/hello",method=RequestMethod.GET)
public String say(){
return content;
}
}

高级使用方式

.yml文件

1
2
3
4
5
6
server:
port: 8082
context-path: /boy
boy:
size: boy
age: 10

新建一个类boyProperties:

1
2
3
4
5
6
7
8
9
10
11
12
13
14
15
16
17
18
19
20
package com.example.demo;

import org.springframework.boot.context.properties.ConfigurationProperties;
import org.springframework.stereotype.Component;

@Component
@ConfigurationProperties(prefix = "boy")
public class boyProperties {
private String size;

private Integer age;

public String getSize() {
return size;
}
public void setSize(String size) {
this.size = size;
}

}

在HelloController中使用

1
2
3
4
5
6
7
8
9
10
11
12
13
14
15
package com.example.demo;
import org.springframework.beans.factory.annotation.Autowired;
import org.springframework.beans.factory.annotation.Value;
import org.springframework.web.bind.annotation.*;
@RestController
public class HelloController {

@Autowired
private boyProperties boyProperties;

@RequestMapping(value="/hello",method=RequestMethod.GET)
public String say(){
return boyProperties.getSize();
}
}

重启,页面显示boy

开发环境和生产环境配置

新建两个yml文件

1
2
3
application-dev.yml

application-prod.yml

dev

1
2
3
4
5
6
server:
port: 9111
context-path: /dev
boy:
size: boy_dev
age: 10

prod

1
2
3
4
5
6
server:
port: 9112
context-path: /prod
boy:
size: boy_prod
age: 10

修改application.yml

1
2
3
spring:
profiles:
active: dev

启动 访问:http://127.0.0.1:9111/dev/hello

再修改application.yml

1
2
3
spring:
profiles:
active: prod

启动 访问:http://127.0.0.1:9112/prod/hello

小知识: netstat -a 在cmd中可以查看哪些端口被占用了

另外的启动方式:jar

1
2

java -jar ****.jar --spring.profiles.active=prod

总结

注解

1
2
3
4
5
6
7
@Value
实现配置内容的注入

@Component

@ConfigurationProperties
上面这两个是用来对配置进行分解

多环境配置

显示 Gitment 评论